Hello everyone!
Wow, it's April already! Love it, spring is definitely in the air and in my frame of mind!
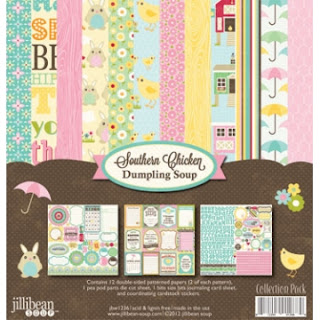
This month I was given Jillibean's Easter line 'Southern Chicken Dumpling Soup' to play with. As well as some gems and card stock from American Crafts and a Zva pearl flourish.
This is a super sweet collection and despite the bunnies and chicks, it is well suited for themes other than Easter, as well. The 'umbrellas' paper is great for general spring as well as shower layouts and cards. The 'chicken coops' paper makes for great farm themed layouts. Shall I go on? lol
For my first layout, I decided to scrap something other than Easter, So I used the 'chicken coop' paper, and paired it with some farm photos.
I love that the colours of the tractor are a perfect pair for these patterned papers. I added some floss and a doily from my stash. It's a little hard to see in this picture but I painted all four edges of this page with a pearly white paint, just for fun, you know how it is!
These sweet little flowers from the DT kit pair up so sweetly with punched flowers.
I used a few journaling stickers and a die cut along the lower right side of the layout. Notice how I punched out a little spot to nest the die cut into. An easy yet effective way the let it stand out.
My title fit so nicely on the doily which helps to make it pop.
My next layout is an Easter page, featuring photos of Timmy and his Easter basket a few years ago.
I was going for a colour block sort of thing, not sure I ended up going where I intended but I like the layout just the same. I really love the pink chicken wire paper.
Popping up just the center of a die cut gives it extra oomph.
This line has so many sweet stickers and die cuts, it's super hard to choose which ones to add to a page and to narrow it down. So I used a ton of them ;)
A little bit of extra bling, just for fun!
My next layout features photos of decorating Easter cookies.
I was going for a shabby chic look for this page, something I have been wanting to do in an over the top sort of way, for quite some time now. My sweet boy's darling little face can pull it off!
I misted the base paper with Mister Huey's white, I divided my photos into 2 groups, the 'during' shots and the 'after' shot. Another doily form my stash mats the 'after' shot.
These sweet little alpha stickers are part of the Jillibean sticker sheet that coordinates with this collection. These sticker sheets are great value for your buck, the include two alphas as well as a plethora of assorted stickers.
I adorned the upper corner with a leftover bit of a die cut strip, some die cute mini hearts and a punched butterfly. Loving the pink wood grain, too!
Love layering embellies for extra pop. Using a staple to hold them on is a fun change from adhesive.
Another mini embellishment cluster, love the little joke word bubble.
Don't be afraid to layer different shapes of butterflies (etc.) or cut up a die cut to make it work on your page.
Loving that I was able to use the pink peal flourish and so many more embellies. In the end I was able to use almost all of the embellishments that came with this collection, it was super fun!
Then I made this card.
I had a very small piece of this pink wood grain paper left and I knew I wanted to use it as the base of my card, So I made the back of the card out of cardstock making it large enough to wrap around the front of the card and secured it to the wood grain piece. An easy fix to my little problem. The eyelets and bakers twine are purely decorative, not for function at all.
These cute little flowers were super easy to make with two different sized punched circle. Cutting them along 4 quartered score lines, created petals and a piece of twine laid into a row clear liquid adhesive, with a little leaf loop finishes them off.
A few stickers create a highlight for my sentiment and a little flower.
For my last project I was hoping to do a little home decor or gift type item. But I was uncertain what I wanted to do. Then I came across a post on a scrappy friend's (read Deanna the enabler ! lol ) blog and I knew what I would create. This sweet little basket.
Stinking cute right, and the whole thing is made form one sheet of card stock! You can find these instructions for this basket here on this Youtube video (I cannot take any credit for it at all).
http://www.youtube.com/watch?v=V3jYZE861bg
I embellished my basket with a cute die cut sentiment, and these flowers create with a Spellbinders die.
Whew, that's all I've got, I hope it's enough to inspire you to create a little something with this collection :) .
Thank you for visiting and seeing what I have been up to! We really appreciate it!
Laura
xoxo


No comments:
Post a Comment