
Hello! It's Laura here and it's reveal time again! I cannot believe it's already February, I hope that means spring is around the corner! And with February we get thoughts of love with Valentine's Day and Family Day celebrations.
In this month's DT kit, the ScrapMuch? ladies, included a few items, that they have fielded customer questions about. They asked me to use them, so that we can demonstrate ways to use these products. Good idea, right?
for me, the kit evoked those warm and fuzzy feelings in me that we get when we think of our families. The MME's papers from the 'Lost and Found" collection, were vintage inspired, with lots of reds, black and white and oodles of glitter! Have a look....
beautiful papers


fun, die cuts, ribbons, and buttons


fun stamps

great mini album cover

And here are my creations.....

I love this layered fan-fold flower from MME...


Next I created this double page layout, it is fairly simple, so even though it is fun and glittery it is totally cool for the boys in my world.....

The 'charming' die cut on page two, was also hand cut from one of the patterned papers. I stamped the 'fun' ticket onto a scrap of patterned paper, and then stamped the pointing finger right onto my layout. There is also a swirl stamped onto the text paper above the picture of my littlest guy. I think I used more stamps on this layout than I have in ages and I really enjoyed using them differently than I usually do.
Lastly I created this mini album, This was one of the items, some of our customers seemed not to know how to use or what to do with. So hopefully this inspires you. It comes with the front and back cover and the two jump rings as well as a bit of ribbon. After that you are unlimited to what you can add to it, put in it or how you can decorate it. You can have as many pages as you want and use pretty much anything you want. For the last couple of months, I have been wanting to do a mixed media album, so I approached this with that in mind and used a few different things as my 'pages'.

F
 or the first page, I simply used a piece of patterned paper as the base, it is a heavy enough weight to stand up to this. I cut it slightly smaller than the cover and then using the cover as a guide punched the holes for the rings.
 Some pattern paper, a border punch, another stamped ticket, a die cut image and a button... done!
I also decided I should have tabs on my pages, and went with punched circle tabs since there were so many straight lines in the book already. I punched two of each style of circle and adhered them back to back on either side of the pages so that each page had the 'good' side facing out.
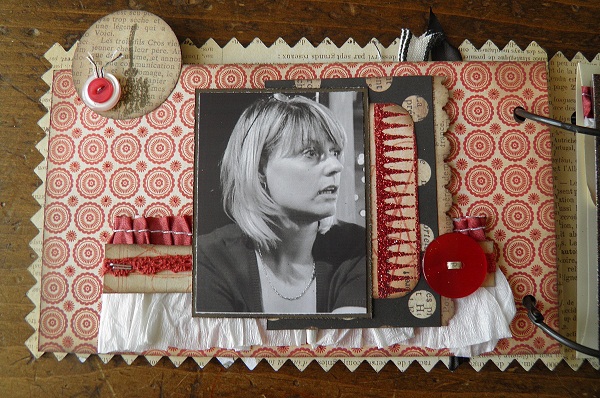
 Now for my page, another photo from my brother... wanna know a secret? It is very rare my mouth is closed in a photo, I am either always talking or eating, ha! Anyway, I like the picture just the same. I thought I'd glam up my page a bit with some of this fun crepe paper ribbon, love it!

For this page of my son, Chris, I used 'clear stock' a heavier weight acrylic. I've had some in my stash for a while, with the intention of using it in a mini album. It is super fun to use.
 Here is another look at that same page, you can see how it is see through. The only trick to using this is to do pretty much the same layout on the reverse, that way you do not have any adhesive showing through.
 And here is the back of the clear page with a layout of my middle son. Jon.

Timmy's page, is pattern paper again. I cut out the part of the paper that I liked the best, with the little bird cages on it. And had to use another little crochet heart of mine.


 Included with the die cuts was this nice one with a great phrase about family, so I thought it would make a perfect last page.
Next, I added an envelope to my book to store any little mementos that might need a home. More crepe paper ribbon, love it!


And just for fun I dolled up the inside of the back cover. The Eiffel tower image is actually a piece of packaging , which I then layered with this die cut. It occurs to me as I finish typing this, that there is one more thing that I should add to my mini album and that is the year. I will definitely do that, so as I make more (and I know I will) we can keep track of who looked like what when!
Thank you so much for stopping by and checking out my creations, I hope this inspires you to find some time to 'play' soon.
Laura
No comments:
Post a Comment