
Can you believe it is October, what a whirlwind September was!
As always, the first of the month is reveal time. This month I was fortunate enough to get one of MME's new Lost and Found 2 collections, called 'Sunshine" to play with. What can I tell you? Do you remember everything you loved about the first Lost and Found collections? Well it is all that and more! New colours, new themes and the glitter stays on the paper! You know what I am talking about, right? But the team's personal preference is the "Sunshine" collection, black white and goldy-yellow! We originally hadn't thought we would carry any of these collections but upon seeing it live and in person at CHA in Chicago, we knew we had to reconsider and carry at least one of them. And 'Sunshine" won hands down.
When I saw the old fashioned bike on this page I knew immediately that I would use it for a background, then when I saw the 5 cent stamp I knew I wanted to use this collection to scrapbook some photos of Timmy playing old fashioned carnival games. I changed my photos to sepia and messed around with the contrast, shadow and brightness a bit until I got what I think is the effect of an old photo you might find in Grandma's attic. What do you think?


This background paper was another one that I really loved! Do you notice a pattern? I tend to use all my favourites pieces as backgrounds, in fact I am using less and less cardstock lately. (Note to self - create some interesting ways to use cardstock as a tutorial or two). The photo of my hubby and I was taken when we belatedly (by 2 months) celebrated our 24th anniversary, it's not the best photo (not a great angle, but that's what happens when your kids are short and they take your picture... last year I remembered to have him stand on a chair, this year I forgot). Oh well, it is a great memory!
The striped ribbon was cut from one of the patterned papers as was the oval
flourish piece. I thought this piece would be a great spot to stitch our last initial. I just used a pencil to draw a 'w' onto the paper then I pierced evenly spaced holes over the pencil lines and went back and stitched with black embroidery floss.

This little glittery banner was cut from one of the sheets of paper. So fun and simple.

I also hand cut all of these subtle little doilies from one of the patterned papers. Then I added some stitching to them as well to make them stand out a little.

On this little doily I used one of the scalloped stamps from the collection to create journaling lines. Fun and easy!

Another layout of me and my sweetie, and another photo taken by Timmy, at least we were sitting this time!
I actually created this layout first and you'll note the yellow striped ribbon that I cut from one of the patterns.... well, didn't I think I was so clever to think this collection needed that! However, when I created the previous layout (which was actually my second creation) you'll notice that I mentioned there was a black and white striped ribbon on one of the papers! I probably should have had a good look at all of the papers before I decided to get so cocky and decide what the collectionwas missing! lol
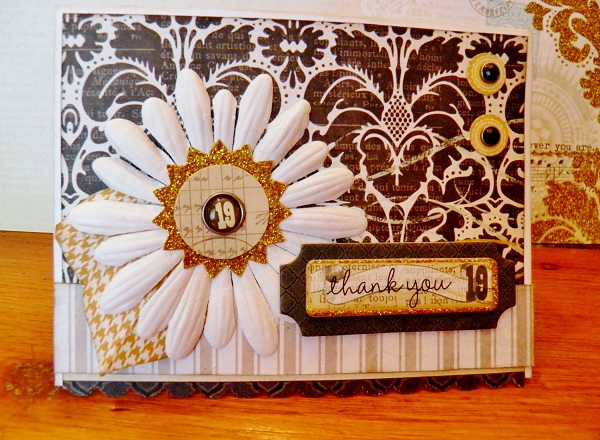
I love the damask paper as well as the hounds-tooth piece that is peeking out from beneath it.

I used lots of sticker and die cuts and buttons and bling that come with this collection, o this layout. Love them all!


I also used my Cuttlebug to die cut a little heart out of the strip of burlap. And isn't that button beee-you- tiful!

Next, I created this little gift set, in keeping with my hostess gift theme for the season. A wine bottle hanger and coordinating card. I thought it would be a nice way to spruce up a bottle of wine when giving it away.
Imagine my surprise when I discovered I didn't have a bottle of wine in the house to 'model' my little wine bottle hanger! This carafe had to stand in, but you get the picture I'm sure!

The card was so simple as the papers are so lovely, you can turn almost any piece into a card. I stamped a sentiment onto one of the label stickers and layered a couple of pretty buttons and called it done!

The wine bottle hanger, however, took a little more work, only because I knew I really wanted it to be this shape and the die I had on hand to create it with only cut out a small piece (the striped piece) . That's okay, I cut out a piece of music note paper the same width and layered them onto a piece of black cardstock along with a small strip of the hounds-tooth. And then I hand cut around the shape creating a mat / background for my piece.

I really like the shape of this die cut that came in the kit, but the sentiment didn't quite suit, so I wrapped it in burlap and added one of the chipboard pennant stickers and a stamped sentiment to create a focal point.

I used a couple of pretty brads to create a spot to tie this piece around a wine bottle.


And lastly, I created one more card. As one can never have too many thank you cards on hand!

Thank you for stopping by today and checking out my reveals. I really cannot express how much I appreciate you taking time out of your busy day to see what I am up to!
Laura
xoxo
No comments:
Post a Comment