Wednesday, March 7, 2012

Tips and Techniques Wednesday - St Pattys Day Banner

Hello all!

Happy Wednesday, I hope you are having a great week!  I thought I would walk you through making a banner for St. Patrick's Day for today's tutorial.

First you will need to gather some supplies....

 Of course I went with mostly greens, adding in some kraft and cream too.  All the patterned papers are MME, from various lines.  The card stock and ribbon are miscellaneous and the Thickers are from American Crafts.

 I did all of my die cutting at once, using both my Cricut and Cuttlebug.  I cut triangular banner shapes from MME kraft paper that has some random text on it.  The banner tops are in a plaid.  Then I cut out the green card stock in an almost star burst circular shape. and lastly the cream circles (I will mount my alphas right onto these).  Decide what you want your phrase to be and make enough of everything to accommodate each letter or decor element you will be placing onto each banner piece.
 Next I inked everything and started adhering.  The banner tops went on first.
 Then the star burst circles.
 The cream circles were adhered with pop dots, to give them a little lift.
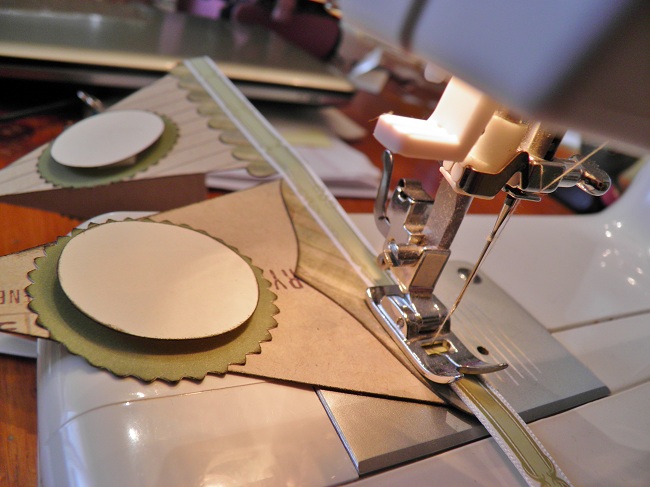
 Once I had these steps done for all 7 of my banner pieces., I sewed the ribbon onto the top edges.  Now I will have something to hand my banner with.  of course you can use an adhesive for this step, but I liked the look the stitching added to my banner.
 The last step is adding the alphas and / or decor elements to your banner.
 Here are some shots of my piece hung in it's home for the season.

 I created this fan fold flower to hold my pot of gold embellishment.  If you have never made a fan fold flower you can find my instructions here.
Here is a full view of my completed project.

Thank you so much for popping in today, I hope you give one of these little banners a try.  You can make them for any occasions, or just to decorate your scrap room or kids room.  It's fun and easy and quick.  From start to finish including gathering supplies and taking photos this one was complete in under an hour!

Laura
xoxo

Tuesday, March 6, 2012

March Colour Challenge

Hello!

It time for our new colour challenge, I hope you play along with us. 

ll you have to do is create a paper crafted project that uses the colours from the challenge and post it on your blog or any other online forum that you can link us up to, by the deadline (about 3 weeks from the start of the challenge).  Then click on the title of your blog post, copy the URL at the top, and link it using Mr. Linky below.


 or

You can join our Flickr group called ScrapMuch? March Colour Challenge  


by clicking on the link, click on join the group, create a log in id and then upload a photo of your project there.  We hope to create a new group here for each month's colour challenge.   Don't forget to leave us a comment and let us know that you joined in on the fun!

Please show the challenge colours on your blog (just copy and paste them) and show a link back to this site to encourage your readers to play along as well.  You can link up your projects here for 3 weeks following the challenge and then we will choose some to feature on this blog.  You can play along as many times as you like, just be sure to link up each creations separately.

In honour of St. Patrick's Day, our colour are

Kelly Green, Kraft, Rich Brown and White        

Remember, you can create anything you wish!  Now go ahead and get crafting, then post your creations on your blog and link them up here.  The deadline for this linking to this challenge is Monday, March 26, 2012 at midnight.  We can't wait to see what you create!

Laura
xoxo

Monday, March 5, 2012

We are so excited!

Hello friends!

We are super excited and it's all thanks to you!  We are so close to hitting 10000 blog visits that we can taste it! 

So why don't you help us get there, and then we can all celebrate!  Keep visiting, we have fun stuff lined up for almost everyday, and then watch for an exciting announcement about how you can help us celebrate!

Have a crafty day!
Laura
xoxo

Friday, March 2, 2012

Sketch-y Friday

Hi all!

Happy Friday!  Here is your weekly sketch!

Enjoy, and remember  if you play along feel free to send your projects to me via email here and I will be thrilled to post them on the blog.


Thank you for visiting!
Laura
xoxo

Thursday, March 1, 2012

Monthly Designer Reveal

Hello all!

This month I was given the New Farmhouse line from October Afternoon to work with.  And the good news is that it has just arrived in our store, so you can play with it too!
I absolutely love this collection, and fell in love with it when I saw it at Cha!  I think it is soft, romantic in a vintage way and oh so versatile.

Have a look at what I created.

U R My Home
This layout is fairly simple, I wanted to highlight the photo and show that the papers worked well even on a page about a man.  Since the sentiment is sort of romantic, the papers work well.
There are coordinating die cuts, buttons, stickers and chipboard pieces for this line, as well as mini alpha stickers.

Bobcaygeon Flora
I kept the lines of this layout clean and simple, so that the papers were featured.  I love the traditional blues and yellows along with grey.

 I love that of the embellishments that I mentioned before, there are hearts, flowers, and butterflies.


Best Friend
 leaving white space allowed me to add the banner that I hand cut from one of the patterned papers.  Some machine stitching was a fun way to highlight the really pretty yellow polka dot paper.  Do you see how some of the polka dots have print on them!  Love that!


 And lastly, I created this card.

I love this large chipboard window frame and lets not forget this sweet little bird.

If you get a chance to play with some of this Farmhouse collection, I know you will love it!   And if you want, you can send them to me here and I will be happy to post them of our Thursday inspiration post!

Thank you for stopping by today!
Laura
xoxo