Hello all!
It's time for my weekly tutorial, and in keeping with my self proclaimed 'hostess gift month', I decided to create a little gift bag and card set. Now I won't go into a ton of detail on the card, as I'm sure you all can totally 'rock' that. And, I know the gift bag is not technically a gift but you may already have picked up a little something for your hostess. For my gift bag, I have chosen to tuck in a few little tea light candles, but you could just as easily tuck in some little specialty chocolates, a fun little piece of jewellery, napkins rings or even seeds for the gardener in your life.
This is a quick and easy project.
Before I started to create my gift bag I knew I had to determine a few things.....
1. I knew I would start with an 8.5 x 11 piece of cardstock.
2. I knew that the width of the bag would also determine the measurement for the bottom of the bag.
3. I knew I would have a seam at the back of the bag and would need to account for an overlap in my measurements.
4. I knew I wanted a 'window' in the bag so the height of the bag could not be greater than 6 inches in order to fit through my Cuttlebug.
I started by using a border punch (something small and simple) along what will be the top of the bag.. It needs to be a small and simple, repetitive punch in order to make aligning up the back a little easier.
Then I cut the width of the cardstock down to 7.5 inches. This will give me a 6 inch tall (thus able to fit through the Cuttlebug) and 1.5 inch wide bag.
Now score along the length of the cardstock, the opposite edge to which you have punched, at 1.5 inches. This 1.5 inch horizontal piece will be the bottom of your bag. I love this Wescott trimmer with the attached scoring blade. It's perfect for simple projects that you don't want to pull out your Scorepal for, or if you are like me and don't own one!
I'm not sure if you can read the scoring dimensions in this photo, but if not that's okay, we'll work through them. If you can see them, please note there is a typo.... where is says 2.5 inches it's should read 2.25 inches.
Starting at the left side of your cardstock and working perpendicular to the punched top edge, score at 2.25", 3.75", 7.5" and 9".
Using your Cuttlebug or other die cutting tool, choose a die to create a window with and lay it in the centre of the part of your cardstock that measures 3.75". You can have it a little closer to the top or bottom as far as height is concerned, whatever suits you or your gift.
This is what it will look like with the window cut out.
Next, using scissors trim along all of the score lines the 1.5 inches up to the horizontal score line.
Now draw a line creating a little triangle on either side of the 3.75" wide flap, and on the right side of the 2.25" flap and the left side of the 2" flap.
Now trim off those 4 little triangles. This will make folding your little gift bag easier and it will sit much more nicely.
I only decorated the front of my gift bag, you can choose to wrap your patterned papers all the way around your bag if you want. Either way, I found it easier to do this step with the bag still flat. I kept the decorating fairly simple, using American Crafts "Peachy Keen" papers as I thought they could be a little fall-ish. and simple layered a couple of patterns and repeated my scalloped punch.
I am using Terrifically Tacky Tape for my project, but whatever adhesive you choose to use, run it along the left edge of the 2.25" length and the bottom edge of the same flap and the bottom edge of the opposite flap. You will want to using a very good adhesive so your gift doesn't fall out of the bag.
Now, I wanted to put my tea lights into a clear bag so they would stay nestled inside the gift bag and not fallout of the 'window', but the only bags I had on hand were sandwich bags. So I trimmed off the zipper part of the sandwich bag. Easy fix!
Then I tucked in my tea lights and tied a little bow around the bag.
Here is the bag with the gift nestled inside.
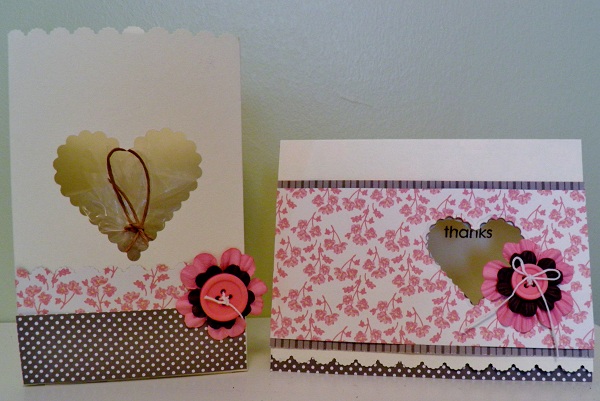
To coordinate the card, I used the same papers and punch as well as embellishments. And I also added a little die cut window (slightly smaller) through which you can see the stamped sentiment.
 |
| A little close up. |
|
|
|
|
 |
| The matching set. |
|
|
|
|
|
Now, see I told you it was easy! And given that you can embellish these pieces as much or as little as you like, makes them even easier! And, you can totally customize them for your recipient or the occasion.
Thank you for visiting today!
Laura
xoxo


No comments:
Post a Comment