Friday, September 5, 2014

Sketch-y Friday a Winner and a Sketch Design Team Call!

Happy Friday!

Yes that is a mouth full, but we have a lot going on!  First up, we have a winner to announce for our August sketch challenges!  We were so amazed with how many lovely entries that we received this month! Thank you to everyone that played along. With the help of random.org a winner was selected.

Which means 6. My Creative Corner: Family Time-Donna is our winner!  Congratulations, please email us at scrapmuch@rogers.com to claim your prize and be sure to grab your winner badge from our left hand side bar.

Now without further ado here is your first sketch for September....


And here is your Team A DT inspiration!


Tiiu 

Now for our Sketch Design Team call - we are looking for an undetermined number of designers to create layouts based on our Sketch-y Friday challenges.  Each of our new design team members will be added to one of our 2 teams, with each team responsible for creating samples for 2 of our sketch challenges per month! 
If you are a loyal and committed scrapper that loves using sketches as a jumping off point for your layouts, read on.....

Design Team Requirements:
  • create 2 layouts per month, using the sketches provided
  • post our badge on your blog (yes you must be a blogger)
  • become a member of our private Facebook group (this is how we communicate as a team)
  • submit your layouts to us by the designated due dates
  • post the ScrapMuch? sketch and your layout, along with a link to the ScrapMuch? blog on your blog  on the day of our reveal (Fridays)
  • share your blog posts on your Facebook page
  • comment on entries, as assigned
  • you do not need to be exclusive to ScrapMuch?, you can belong to one other sketch DT or unlimited other DT's, however you may not belong to any other scrapbook store DT's
  • you must be loyal and committed to promoting ScrapMuch?
This call is open to scrappers in Canada and the U.S., you do not need to have Design Team experience to apply, all applications will be considered.  The term will run for 6 months, from November 1st, 2014 until April 30, 2015.  No compensation is provided.

To apply, create a layout using one of our September 2014 sketches.  Link it up using our Inlinkz tool, adding DT call after your name.  Yes, you will also be entered into our monthly prize draw! We will be sure to visit your blog and leave you some love.  We will contact all those we are interested in during the first week of October, at which time we may ask for more information.


Here is a run down of our Sketch-y Friday rules.  Just link up your creations in our sidebar to be entered into a random draw for our monthly prize.    You have until September 29th, at midnight to participate in any of September's sketch challenges, each linkup tool will remain open until that date!

If you are playing along with more than one challenge you will need to link each of them up via a separate blog post for the link up tool to work. (International participants may be required to pay some shipping fees.)  Good luck, we cannot wait to see what you create!

*note - If you are playing along using Flickr the team will no longer be leaving comments, due to changes in Flickr policies and passwords.  However, we will be checking out your entries for sure and you are definitely eligible for the prize draw. Our apologies for any inconvenience this may cause.

Thanks for visiting!
Your friends at ScrapMuch?!

Thursday, September 4, 2014

Inspiration on Thursday

Hello!

We are back with another Inspiration on Thursday post,  we hope it makes you want to craft as it does us!

Today's page was created by Elaine!


 She sure is!

Thanks for visiting!
Your friends at ScrapMuch?

Wednesday, September 3, 2014

DIY Chalkboard Photo Prop - Tutorial

Hi there!

I have a new tutorial to share to day.  I have seen a lot of chalkboards being used as back to school photo props, and I love the idea. I don't know why but I have always loved chalkboards.  Since I do not own a small one, but I do own a lot of alterable objects and some Martha Stewart chalkboard paint I thought I would DIY one.

 I am using a dollar store wood plaque to create my chalkboard that I have had kicking around for a while now.  You probably have something in your stash that you could use too! I also pulled out my Chalk paint to paint the edges of my plaque once I am done the chalkboard process.

 I taped off the edges of my plaque with painters tape. I wanted a framed look on my finished project.


 Next I used a foam brush and added a good coat of chalkboard paint, making sure to keep it really smooth.

The label suggests a minimum of 2 coats, with an hour drying in between.  It literally takes seconds to add the paint and it sure isn't hard to find something to do between coats.

After two coats I gave my plaque a really light sanding.  Pine is a softwood and the fibers tend to raise a bit after a coat of paint.  It only took a minute of sanding to make it smooth again.

I ended up giving my board 4 coats of paint, I wanted a really good quality chalkboard finish.

 Bonus tip - Storing your paint brush between coats, in a ziploc keeps it from drying out.

 Once I pulled off the painters tape, I decided I liked the wood edges and opted to skip painting them with my chalk paint.

 The instructions recommend leaving the project to dry and cure for 24 hours after the last coat.  Given that it was 2am I opted to head to bed, lol!


Once cured you need to treat the board by rubbing the chalk all over it and then wipe it off.

 Now you are ready to go!

Super, super easy and I love it!

Here you can see that I have already put this to good use.

I can also see me incorporating this into my Christmas decor, as a countdown board or something.  I will definitely get some use out of this and the chalk works great on it!

Email the store to find out how you can get a jar of this great paint, it lasts a long time and you can do so much with it!


Thanks for visiting!
Laura
xoxo

Tuesday, September 2, 2014

Kit Club tuesday - This Month's Reveal

Hi friends!

We are sharing the contents of our fabulous September Kit Club kit this month, you are going to love it!  It is just perfect for getting you back on track with your scrapping after spending the summer with family and taking what we are sure amounts to hundreds of photos!

Regular Kit Contents

Additional Premium Kit Contents

We cannot wait to see what you create with it, be sure to share with us on our Facebook page or better yet, use your kit to play along with our Sketch-y Fridays and link up for your chance at the prize!

Thanks for visiting!
Your friends at ScrapMuch?

Monday, September 1, 2014

Laura's Monthly Reveal - Simple Stories

Hi there!

I am so excited to share my reveal today, I had to much fun with the "Hello Baby" collection from Simple Stories!  I pulled out a few of my favourite baby pictures of my three boys to create with.  It was nice to scrap them again in my current style ;)

Here are my designs:

This first layout, features my first born at about a 4 weeks old, I created a little Polaroid confetti pocket using a technique I learned from my scrappy friend Michelle.  I did add a few little wooden stars from my stash as I thought they went so nicely with this collection.

Here are a few close ups:


Next up is a page I created featuring a photo of my second boy, taken when he was about 6 months old.  I couldn't find a newborn photo of him that would scan nicely so I went with this one (these boys were born before digital time).

Here are a few close ups of this page:


This collection has so many amazing embellishments, from die cuts to chipboard and stickers.  I tried really, really hard but couldn't use them all ;)


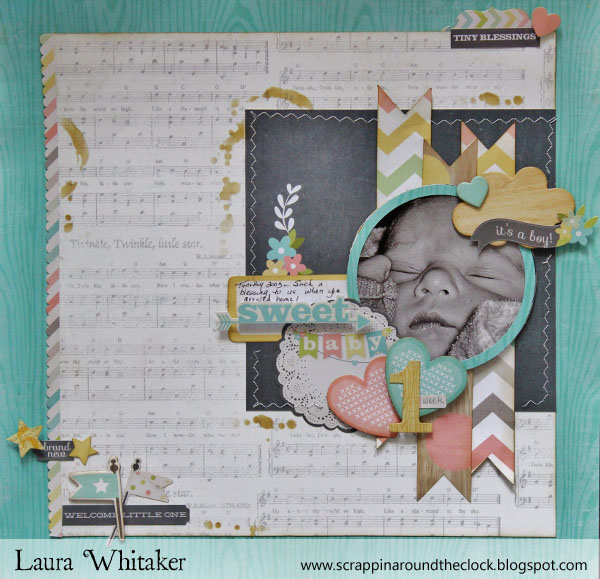
And of course, I had to also do a page of my youngest boy.

This photo was taken about a week after our little Timmy arrived home.  I still remember getting the phone call that he was coming, just as if it were yesterday.

A few close ups:


 I actually stopped creating layouts here and went on to create an altered item and a card, which I will share below, but I really wanted to create a baby bath time layout so I went back to the drawing board.

I loved the colours in the floral paper but didn't want to use it whole hog so I designed this joined stars background cut file to use with this paper. I love the way it looks with this pattern and  the green wood grained background.

Here are some close ups:


As promised here is a look at the altered item, I used a little wooden box to create a little keepsake box for baby treasures.


And here is a little card, too:


Thank you so much for sticking with me in this super long post! And humoring me on my little journey down memory lane!

Laura
xoxo